6mm Wargaming

Terrain Boards project - The Extras

Introduction

This page shows the construction of the extra scenery I made specifically for the terrain boards. The materials used for the board meant that I can stick some terrain pieces into the board to help hold them down.


Click on the thumbnails to see the full sized image


Power poles

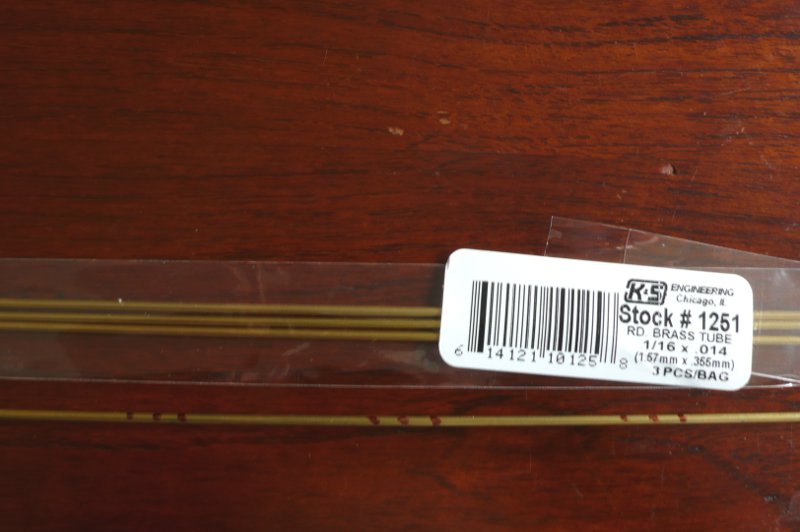
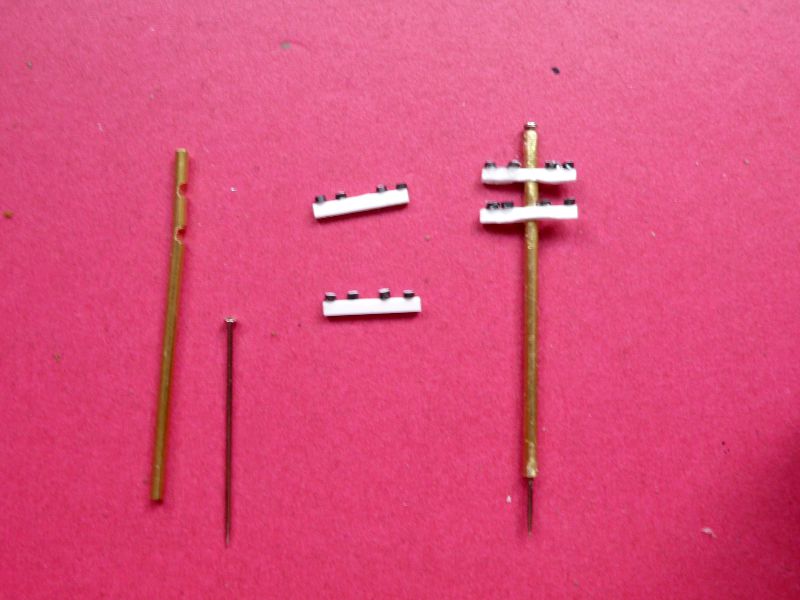
I got a couple packs of brass tubes (enough to make 30 + power poles) and marked the length for each pole. Next I used a pack of pins and chopped the pins up, with the sharp bit being used to stick into the board. I also used the leftover pin head to fill to hole at the top of the pole but putty could be used instead. The cross pieces were made from plastic card strips and 
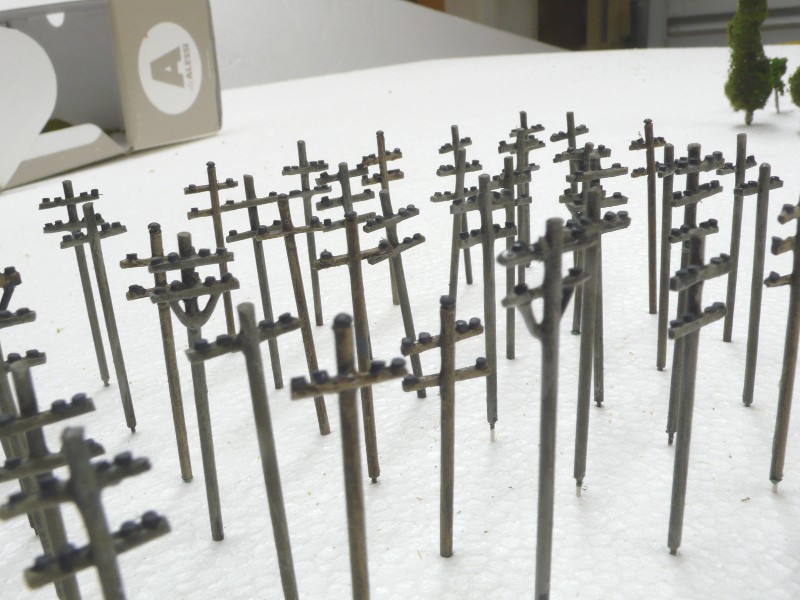
plastic rod. I made different styled power poles with some have 1 cross piece and some 3 and a few with supporting brackets underneath.

To construct the poles I cut the brass to length and then used a dremel tool to grind some grooves into the pole (hopefully this will make the cross pieces more robust). Next I got the strips of plasticard rod and cut small disks and glued the disks onto the strips to represent the insulator. Then I glued the crosspieces in along with the pin head and sharp bit. Finally they were painted a natural weathered wood colour and the rods bits were painted dark grey.


Removeable trees

For making the removeable trees I used a pack of 70 Woodland scenics pine style trees (2.5 -4" tall). Some of the larger trees were chopped in half to make 2 smaller trees so I should get about 100 trees from the pack. Normally I'm not a fan of their trees (I dont think they look very realistic) but I got them so because I knew I could insert pins into the plastic trunks without too much effort. Excluding forest and terrain pieces, I figure I need at least 10 trees per 2x2 foot tile, x 12 tiles per table = 120 trees!

You can see the various construction steps from left to right in the pictures. First the plastic tree trunk was cut to size, then a hole was drilled and a cutdown pin was glued and inserted using pliers. Next cover the branches with glue and fluffy stuff. The white fluffy stuff is packaging from Copplestone and Perrys figures, which you get in the little boxes they put their figures in, but pillow stuffing would work. Next they were sprayed brown and grey and then flocked. The final step is to drybrush the trunks a lighter grey colour (because most trees look grey over time).


More trees

I had a couple of the wider Woodland scenic trees amatures spare so I gave them the same treatment. I always find the WS trees don't have enough branches so I added some more from brass picture framing wire.

The last tree in the picture is a cheap Chinese Ebay tree. I untwisted the trunk piece of the wire and inserted a headless pin and twisted it back up again and then smeared some UHU glue on it. It didn't come out as well as the others so I only made a few like this.


Hedges

Another feature of the board is hedges which were made to cover parts of the boards, as I liked the idea of hedge lined roads and fields. It looks very good but when the boards were used for the first time, I realised there was no where to put terrain next to the roads such as towns, because the hedges were in the way!!

The hedges were relatively easy and quick to make. The photo shows the different stages of the hedge construction. First cut the cleaning pads into strips and then pull bits off to make them look uneven. You don't want to cut too straight in this step as country hedges would not be as neatly trimmed as town hedges. Then spray with brown paint (it doesn't look very brown in this picture) and then flock. I mixed up some flock for the hedges in this picture but a very close match to what I used is Hornby's "Medium Green Blended Turf", which I discovered afterwards.


Roads Part One

One of the main areas I was unsure about when the boards were being constructed, was what to do with the roads. Tarmac roads look nice but then I'm limited to using the boards for 20th century gaming, so I decided to stick with dirt roads. A while after the boards were finished I made some tarmac roads for a friend and realised that I could use the same technique to make removeable roads for my boards. The idea was that they would fit on top of the existing roads and the roads would tuck under the hedges and these would help keep the roads in place.

I use "L shaped" plastic pockets for my roads they are very cheap and approx 300mm (A4 size) long which is a useful size and come in packs of 12. First lightly sand the side you want to stick the tape down to. Then use a marker pen and draw/ mark out the shapes of the roads. I usually allow about 4-5mm on each side for the edges and the total width of the road is about 30mm but this can be reduced later . Next I use a pick of cheap MDF and taped strips slightly longer than the entire length of the road piece (the excess tape helps hold the plastic sheet down). Be careful not to stretch the tape too much, otherwise the tension may cause the road to curl up, once released.

The tape I used is "3M Masking tape 233+ Premium Masking Tape" - which was the stickiest stuff they had at my local hardware shop. I use this because I prefer the slight texture that it has and it takes paint well.

The photos show construction in in progress. I didn't bother marking the roads very carefully as these are for my terrain boards so I will need to trim the edges to fit.


Roads Part Two

These are designed to fit on my boards hence the funny shapes and thicknesses. Where I need to change the angle of the tape I cut a straight line gently with a sharp knife, and then run the second piece slightly overlapping, press it down and then trim off the excess. The picture shows this with (A) yet to be trimmed and (B) and (C) already cut. Both of these aren't the best of cuts, so I use a very small amount of black caulk to fill the gaps and smooth over the join.

Also I use a knife to cut the curves for the roads which are usually done freehand, and peel off the excess masking tape. This can be tricky as the tape hides the lines you have drawn, so it is a bit of guess work to get the curves looking good. Also you don't want to press to hard othewise you will go right through the road! I recommend a sharp blade and light pressure and let the blade do the cutting (rather than ripping).

Next I spray them with some a cheap black spray can and I normally would use a flatter black than this. After that I cut the shapes out as I find it easier to work with them individually for the remaining steps. I use sicssors to cut the lengths and a sharp knife to cut the tape off the ends of the roads. I found on the ends of some roads that the masking tape was visible, so it was given a quick spray of black paint to cover this. Before moving on to the next step leave the roads for at least 24 hours to make sure the paint is completely dry.


Roads Part 3

Next I airbrush the roads with a dark grey giving the whole road a light dusting , followed by a heavier coat in the middle section of the road.

Now is the tedious part of making roads. I use a fine white gel pen, a ruler and some old draughting curves and draw the road markings. The important part is to make sure that the centre line and edge lines are the same width on all the pieces so that they join in the same place. My masking tape is 24mm wide so I make the roads 20mm wide with each lane 10mm and that's a nice easy number to remember. You can also get yellow gel pens but I haven't tried those. I use the curves to try and make smooth and consistent curves otherwise you will have to freehand it.

Then I paint the edges of the roads where I want to grass section to be. The grass probably shouldn't be this close to the edge of a road but it looks good and provides a nice contrast. Also touch any areas where the white pen has smudged. I paint over it with the dark grey I used to airbrush with. Don't worry if it look patchy as most roads do and the next step will hide it.

The final step (before varnishing) is to airbrush a light coat of a dusty colour (I use Tamiya buff) onto the roads. I squirt a strip of this colour down each lane of the road and then sometimes an overall dusting of buff. The picture shows the left hand roads which haven't been airbrushed with dust vs the ones on the right which have.

You can see in the picture some of the joins in the masking tape are showing through and I should get a black pen or pencil and make some cracked roads section to help hide these. However I don't think its necessary as the joins look pretty good in my opinion.


Even more on roads

I found that the A4 sheets tended to warp and curl up a bit more than the A3 sheets so it most be a different material. I would suggest storing them flat with something heavy on them to keep them flat, when not in use. You can use a thicker material like plasticard but I like the thinness of these and they are bend and can folder over terrain.

The second picture shows what not to do! If your making roads to fit special shapes/curves, make sure you stick the tape to the CORRECT side of the plastic strip, not like here... I taped almost all the roads I needed for my 12 terrain boards and then when I tried to fit them, I found that the tape was put on the wrong side.

Finally the last picture shows them finished. They still need some work to sit flat and I found that the pins on the bottom of the trees and power poles can spike through the roads, and help pin them to the board.